8 min to read
Three.js로 3D 플랫폼 개발 [Material]
Material과 관련된 10가지 종류의 mesh에 대해 알아본다.
Three.js를 이용한 3D 플랫폼 개발 개념공부
Material
Mesh는 Geometry와 Material로 이루어져 있는 것으로 알고 있다. 우리는 Geometry는 Shape을 구성하는 요소라는 걸 알고 있고, 배웠기 때문에, Geometry를 잘 생각해보면 좋을 것 같다.
- Geometry 위에 색깔이나, 텍스쳐를 올리는 것을 Material이라고 생각하면 될 것 같다.
기본적인 Material의 종류는 10가지 정도로 정리해볼 수 있을 것 같다.
- meshBasicMaterial (wireframe)
- meshBasicMaterial
- meshLambertMaterial
- meshNormalMaterial
- meshStandardMaterial
- meshPhysicalMaterial
- meshDepthMaterial
- meshMatcapMaterial
- meshToonMaterial
meshBasicMaterial
wireframe 자체 속성은 meshBasicMaterial에만 있는 것은 아니다, 다만 다른 속성들과 다르게 우리가 생각하느 그 뼈대의 느낌으로 생각하는 wireframe의 형태는 meshBasicMaterial이기 때문에 이것을 메인으로 생각하면 될 것 같다.
특히, 신경써야하는 부분은, transparent 속성을 false로 해둔다면, opacity조정을 못하는 상황이 생기기도 한다고 한다.
- opacity 속성을 건드리고 싶다면, 꼭 transparent속성을 켜두자.
기본적으로 meshBasicMaterial과 같은 속성은, 빛의 영향을 받지 않는 재질을 의미하기 때문에 기본적으로 명암 같은 것들이 보여지지 않는다.
<fog attach={"fog"} args={['blue', 3, 10]}/>
<mesh>
    <meshBasicMaterial
        color="red"
        visible = {true}
        transparent = {false}
        opacity={0.7}
        side={THREE.BackSide}
        alphaTest={0.6}
        depthWrite={true}
        fog={true}
    />
</mesh>
- side의 경우 어느 한쪽의 면만 보여주는 효과이다.
- fog의 속성은, 해당 material이 안개에 영향을 받을 것인지를 보여준다. fog를 위에서의 코드처럼 따로 지정해주어야 한다.
- alphatest는 threshold라고 생각하면 좋은데, opacity가 이 기준을 넘어가면 아예 보이질 않아버린다.
- depthtest의 경우 거리감 없이 거리계산을 아예 하지 않는 상태가 된다. 그래서 물체가 무조건 앞에서 보이듯이 보인다.
depth buffer
이 depth buffer(또는 Z-Buffer)는 깊이 정보를 저장하는 데 사용한다. 이는 Object3D 화면에 어떤 순서로 그려지는지 결정된다.
- 계산된 깊이 정보는 렌더될 때마다 depth buffer에 기록된다.
- 객체가 렌더링 될 때 → WebGL은 color buffer를 그리기 전, 해당 픽셀 z축에 존재하는 depth buffer를 확인한다. depth buffer가 더 작은 값에 해당하는 것을 렌더한다.
그래서 depthtest랑 depthwrite랑 뭐가 다른건데?
- depthTest는 렌더될 때 현재 깊이 값을 기존의 depth buffer와 비교할지 결정하는 옵션이다. depthTest가 활성화되어 있으면 새로운 깊이 값이 기존 깊이 값과 비교되고, 이 비교에서 통과되는 경우(=== depth buffer가 더 작으면 === 카메라 기준 더 가까우면) 해당 픽셀이 화면에 그려진다.
- depthWrite는 새롭게 렌더될 때 깊이 값을 depth buffer에 기록할지 여부를 제어하는 옵션이다. depthWrite가 활성화되어 있으면 새로운 깊이 값이 depth buffer에 기록되고, 다음 프레임 때 사용한다.
Reference
- https://stackoverflow.com/questions/37647853/three-js-depthwrite-vs-depthtest-for-transparent-canvas-texture-map-on-three-p
- https://blog.maximeheckel.com/posts/the-magical-world-of-particles-with-react-three-fiber-and-shaders/
LambertMaterial
<mesh>
    <meshLambertMaterial    //매트한 재질
        color="red"
        visible = {true}
        transparent = {false}
        opacity={0.7}
        side={THREE.BackSide}
        alphaTest={0.6}
        depthWrite={true}
        fog={true}

        // emissive={'yellow'} //재질보다는 방충하는 색깔 값이라고 생각하면 된다.
    />
</mesh>
반짝이지 않는 표면을 구현할 때 주로 쓰이는 material. 살짝 매트한 재질을 의미한다고 생각하면 되겠다.
emissive: Color|undefined → 객체 내부에서 방출하는 빛의 색이다. 기본값은new THREE.Color( 0x000000 )(검정)- Lambert, Phong, Standard, Physical, Toon에만 존재하는 property.
- Phong, Standard, Physical보다 반사, 조명 모델이 간단하여 그래픽 정확도의 비용이 덜 든다
PhongMaterial
<mesh>
    <meshPhongMaterial    //쨍한 재질(반사광)
        color="red"
        visible = {true}
        transparent = {false}
        opacity={0.7}
        side={THREE.BackSide}
        alphaTest={0.6}
        depthWrite={true}
        fog={true}

        emissive={'black'} //재질보다는 방충하는 색깔 값이라고 생각하면 된다.
        specular={"#fff"}
        shininess={40}
        flatShading={true}
    />
</mesh>
반사광이 있는 표면을 구현할 때 쓰는 material.
물리 기반 렌더링(PBR. Physical Based Rendering)이 적용된 material
물리적인 원리에 기반하여 물체의 실제 광학적 특성을 더 정확하게 시뮬레이션하여 현실감 있는 결과를 나타내는 렌더링 기법. 더 복잡하고 정밀하여, 계산량이 더 많고 렌더링 엔진에 높은 성능을 요구
StandardMaterial
{/* 물리기반 렌더링 */}
<mesh>
    <meshStandardMaterial
        color="red"
        visible = {true}
        transparent = {false}
        opacity={0.7}
        side={THREE.BackSide}
        alphaTest={0.6}
        depthWrite={true}
        fog={true}

        emissive={'black'} //재질보다는 방충하는 색깔 값이라고 생각하면 된다.
        roughness={1}
        metalness={0.9}
        flatShading={true}
    />
</mesh>
StandardMaterial에서 Clearcoat, Physically-based transparency,Advanced reflectivity, Sheen property를 추가한 것이 바로 PhysicalMaterial이 된다.
- PhysicalMaterial에서
thickness조절 시roughness가 1 미만이어야 함 - flatShading은 매끈하게 깎을지 혹은 파티클을 모두 표시할지를 의미한다.
<mesh>
    <meshPhysicalMaterial
        color="white"
        visible = {true}
        transparent = {true}
        opacity={0.7}
        side={THREE.BackSide}
        alphaTest={0.6}
        depthWrite={true}
        fog={true}

        emissive={'black'} //재질보다는 방충하는 색깔 값이라고 생각하면 된다.
        roughness={1}
        metalness={0.9}
        flatShading={false}
        clearcoat={0}
        clearcoatRoughness={0}

        transmission={0.5}
        thickness={controls.thickness}
        ior = {2.33}
    />
</mesh>
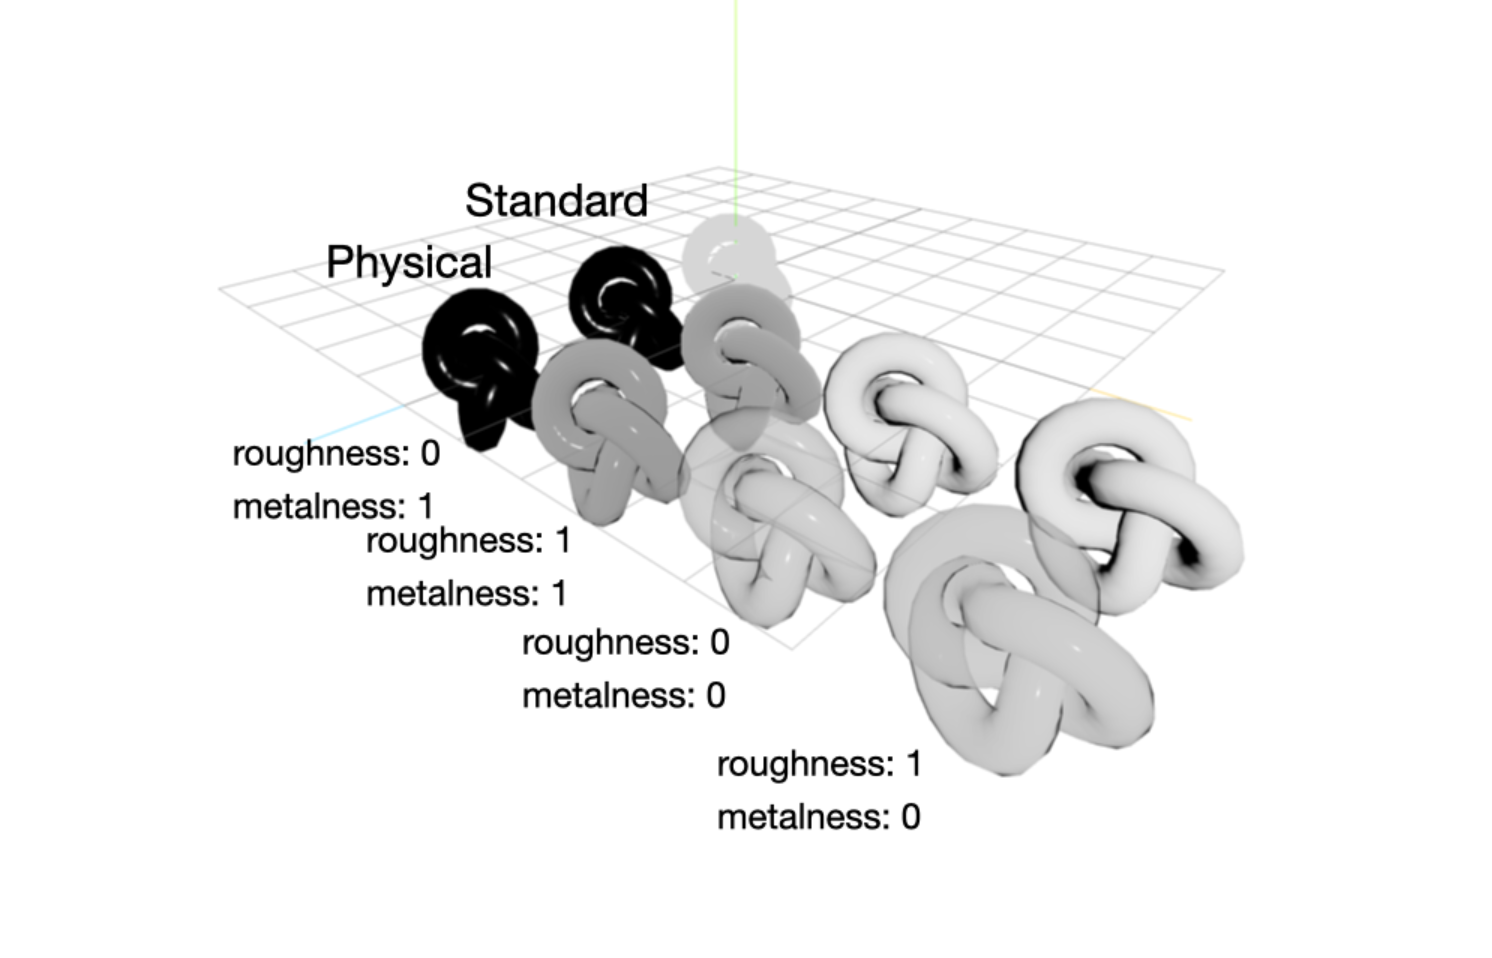 normal과 physical의 차이점을 확인할 수 있을 것 같다.
NormalMaterial
<mesh>
    <meshNormalMaterial/>
    {/* Normal 값들을 RGB값으로 변환 시킨 것이다. */}
</mesh>
normal vector(법선 벡터) 값을 RGB로 나타낸 material. 객체의 표면에서 수직으로 나아가는 벡터를 RGB로 그대로 옮겨 해당 vertex의 color가 지정되는 것이다.
- 별다른 설정을 하지 않은 경우 법선 벡터는 카메라의 좌표계를 따라간다. 그래서 항상 보이는 면에서 y축 방향과 수직인 vertex는 초록색을, z축 방향과 수직인 vertex는 파란색을, x축 방향과 수직인 vertex는 빨간색을 띤다.
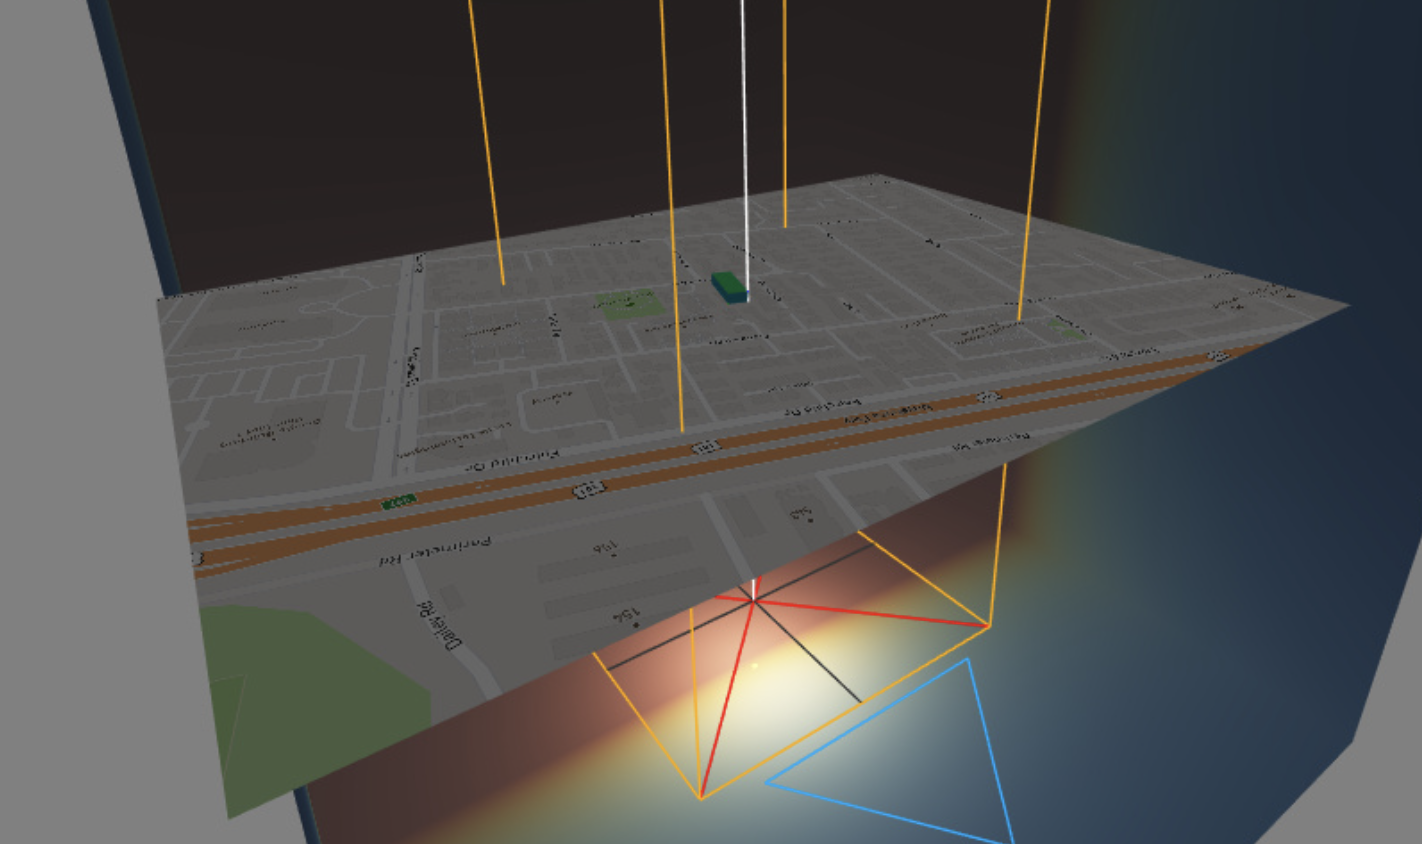
DepthMaterial
<mesh>
    <meshDepthMaterial/>
</mesh>
빛과는 상관없이 Depth 값에 의해 그려지는 material. depth는 카메라와 객체가 렌더되는 위치와의 거리를 나타낸 값이므로, 카메라의 zoom 정도에 따라서 밝기가 달라진다.
MatcapMaterial
const matcap = useTexture('./img/matcap2.jpg');

return(
    <mesh>
        <meshMatcapMaterial matcap={matcap} flatShading = {false}/>
        {/* 빛이 없어도 그대로 나타내짐 */}
    </mesh>
)
원하는 표면을 덮어씌울 수 있는 material.
ToonMaterial
const tone = useTexture('./img/fiveTone.jpg');
tone.minFilter = THREE.NearestFilter;
tone.magFilter = THREE.NearestFilter;

return(
    <mesh>
        <meshToonMaterial gradientMap={tone} color = "brown"/>
    </mesh>
)
만화 느낌이 나도록 만드는 material.
group으로 자동화
const meshRef = useRef<THREE.Mesh>(null);
const groupRef = useRef<THREE.Mesh>(null);

useEffect(()=>{
    const meshLength = groupRef.current!.children.length;
    for(let i = 0; i<groupRef.current!.children.length; i++){
        console.log(groupRef);
        const mesh = groupRef.current!.children[i] as THREE.Mesh;
        mesh.geometry = meshRef.current!.geometry;
        mesh.position.x = i % (meshLength/2) *2 -4;
        mesh.position.z = 0;
        if(i >= meshLength /2){
            mesh.position.z = 2;
        }
    }
    // meshCopyRef1.current!.geometry = meshRef.current!.geometry;
    // meshCopyRef2.current!.geometry = meshRef.current!.geometry;
},[])
- meshRef라는 대표적인 ref를 만들고, for문을 통해 mesh가 몇개가 만들어지든, 각각에 meshRef를 공유하도록 만들어서 자동화하였다.
- groupRef의 children에 group의 mesh들이 모두 들어있다는 건 신기했다.

Comments